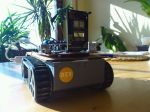
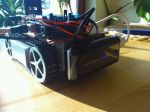
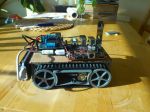
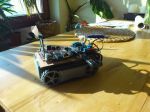
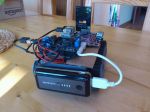
The Beagle robot can be now controlled with a Joystick remotely from a PC via a wireless connection (either Wifi or 3G) and stream a live video from the camera:
here a live video :
The Beagle robot can be now controlled with a Joystick remotely from a PC via a wireless connection (either Wifi or 3G) and stream a live video from the camera:
here a live video :
Posted in Uncategorized | 6 Comments »
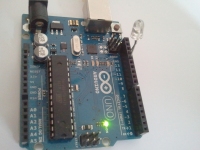
I succeed in getting Arduino controlled from a PC using a Joystick 🙂
I used python game module for that. The code right now is dirty so I’ll have first to clean it up then I’ll share it.
The next step will be to control the Beagleboard + Arduino Robot via a wireless connection.
Posted in Uncategorized | 8 Comments »
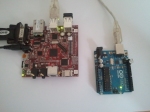
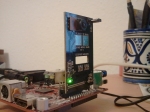
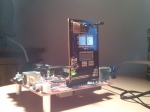
I’m building a robot by using the Beagleboard-xm as a control unit running software for high-level functionalities such as:
On the other hand, Arduino implements low-level functions such as:
Here are the first pictures:
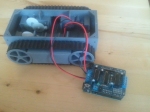

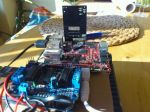
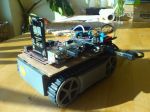
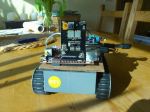
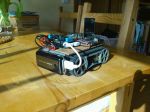

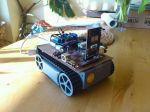
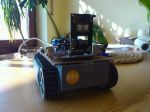
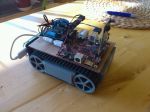
Details coming soon …
Posted in Uncategorized | 3 Comments »
In this post I’ll show how to establish a serial communication (over USB) between the BeagleBoard and Arduino using a Java program. The Program will send commands from BB-XM to toggle a LED on the Arduino.
Hardware components:
Arduino Set Up
Before begin interfacing BeagleBoard with Arduino, you must have the Arduino IDE installed and configured. Once it is done, upload the following sketch from your PC:
void setup(){

Serial.begin(9600);
pinMode(13, OUTPUT);

}

void loop (){

if (Serial.available()) {

//read serial as ascii integer
int ser = Serial.read();

//The ascii equivalent of numbers 0-9 are 48-57
if(ser >= 48 && ser <= 57) {
   int xTimes = ser - 48;
   Serial.print("Blink LED x");
   Serial.println(xTimes,DEC);
   TooglePin(13,xTimes);
   }
 }

}

void TooglePin(int pin,int n){

   for (int i = 0; i < n; i++) {
   digitalWrite(pin, HIGH);
   delay(1000);
   digitalWrite(pin, LOW);
   delay(1000);
  }
}
This sketch will basically set Arduino to read incoming serial data as ascii
integer, if it’s between 0-9 then the pin 13 (LED) is toogled xTimes (incoming command).
BeagleBoard Set Up
For the Software Angstrom Linux will be used, the default kernel has support for tty ACM devices (Arduino) if not you can use opkg to install the kernel module:
opkg install kernel-module-cdc-acm
when Arduino is attached to the Beagleboard, something like that should be displayed:
[ 7963.286163] usb 2-2.4: new full speed USB device using ehci-omap and address 16
[ 7963.417602] usb 2-2.4: New USB device found, idVendor=2341, idProduct=0043
[ 7963.425354] usb 2-2.4: New USB device strings: Mfr=1, Product=2, SerialNumber=220
[ 7963.433959] usb 2-2.4: Manufacturer: Arduino (www.arduino.cc)
[ 7963.439788] usb 2-2.4: SerialNumber: 7493430303035111E150
[ 7963.459197] cdc_acm 2-2.4:1.0: ttyACM0: USB ACM device
Not so well known but the full Java Standard Edition can run on the BeagleBoard, luckily it is available in the Angstrom package feed.
you need to install for that the openjdk-6 java runtime environment on the BeagleBoard:
opkg install openjdk-6-jre
For Java serial communication the RxTx library is needed:
opkg install librxtx-java librxtx-jni
Now the BeagleBoard is ready to talk to Arduino using Java:
SerialComm.java
import gnu.io.CommPort;
import gnu.io.CommPortIdentifier;
import gnu.io.SerialPort;

import java.io.FileDescriptor;
import java.io.IOException;
import java.io.InputStream;
import java.io.OutputStream;

public class SerialComm
{
/** Milliseconds to block while waiting for port open */
private static final int TIME_OUT = 2000;

/** Default bits per second for COM port. */
private static final int DATA_RATE = 9600;

public SerialComm()
{
super();
}

void connect ( String portName ) throws Exception
{
CommPortIdentifier portIdentifier = CommPortIdentifier.getPortIdentifier(portName);
if ( portIdentifier.isCurrentlyOwned() )
{
System.out.println("Error: Port is currently in use");
}
else
{
CommPort commPort = portIdentifier.open(this.getClass().getName(),TIME_OUT);

if ( commPort instanceof SerialPort )
{
SerialPort serialPort = (SerialPort) commPort;
serialPort.setSerialPortParams(DATA_RATE,
                               SerialPort.DATABITS_8,
                               SerialPort.STOPBITS_1,
                               SerialPort.PARITY_NONE);

InputStream in = serialPort.getInputStream();
OutputStream out = serialPort.getOutputStream();

(new Thread(new SerialReader(in))).start();
(new Thread(new SerialWriter(out))).start();

}
else
{
System.out.println("Error: Only serial ports are handled by this example.");
}
}
}

/** */
public static class SerialReader implements Runnable
{
InputStream in;

public SerialReader ( InputStream in )
{
this.in = in;
}

public void run ()
{
byte[] buffer = new byte[1024];
int len = -1;
try
{
while ( ( len = this.in.read(buffer)) > -1 )
{
System.out.print(new String(buffer,0,len));
}
}
catch ( IOException e )
{
e.printStackTrace();
}
}
}

/** */
public static class SerialWriter implements Runnable
{
OutputStream out;

public SerialWriter ( OutputStream out )
{
this.out = out;
}

public void run ()
{
try
{
int c = 0;
while ( ( c = System.in.read()) > -1 )
{
this.out.write(c);
}
}
catch ( IOException e )
{
e.printStackTrace();
}
}
}

public static void main ( String[] args )
{
try
{
(new SerialComm()).connect(args[0]);
}
catch ( Exception e )
{
// TODO Auto-generated catch block
e.printStackTrace();
}
}
}
This simple code open a serial connection and then interact with it (receiving and sending data).
To be compiled on a Host PC (with an installed JDK) using:
javac SerialComm.java
The compiled classes need to be transferred on the BeagleBoard file system then can be started with:
root@beagleboard:~# java -cp .:/usr/share/java/RXTXcomm.jar \
-Djava.library.path=/lib:/usr/lib/jni \
-Dgnu.io.rxtx.SerialPorts=/dev/ttyACM0 \
SerialComm /dev/ttyACM0
The Java program need to be supplied with the Serial port name /dev/ttyACM0 as an argument. Now you can blink the LED from the Beagle by simply writing on the console numbers between 0-9 :
Posted in Uncategorized | 22 Comments »
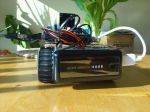
In this post , I’ll describe a practical use of the Beagleboard : It’s about building a Wireless IP camera for Home surveillance.
Hardware components:
The Set-up of the Wi-Fi dongle and the camera were described in previous posts on this blog.
For the Software I used Angstrom Linux and MJPG-Streamer which is not available as an Angstrom package but I had to build it manually for the Beagleboard:
First checkout the source from the Subversion repository :
svn co https://mjpg-streamer.svn.sourceforge.net/svnroot/mjpg-streamer mjpg-streamer
then cross compile it by issuing :
cd  mjpg-streamer/mjpg-streamer &&
make CC=arm-angstrom-linux-gnueabi-gcc
If the build is successful it will generate “mjpg_streamer” binary and plugins : a set of shared libraries (*.so)
that you need to transfert to the filesystem of the SDCard plus the “www” folder.
Finally you can lunch the mjpg-streamer webserver with :
./mjpg_streamer -i "./input_uvc.so -d /dev/video0 -y" -o "./output_http.so -w ./www"
(or put it in a script that start automatically)
The mjpg-streamer is listening on the TCP PORT 8080 so you’ll able to view the video stream by pointing any browser on the beagleboard IP address:
http://beagleboard:8080
you can also configure your router to allow external access from the Internet on your video stream by enable 8080 port forwarding.
Here is a live demo video (view from my balcony):
and here is a nightly stream demo:
Posted in Uncategorized | 12 Comments »
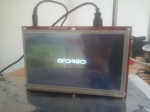
I just made the first steps to make Android ICS working with the ULCD7 🙂
I’ll write a how-to and publish the patches as soon as I have finished.
here are the first pictures:

Posted in Uncategorized | 4 Comments »
Recently I bought a LI-LBCM3M1 camera from Leopard Imaging, a module specially designed to work with BeagleBoard.
The module main features are :
Here are some pictures:

The advantage of using this kind of cameras compared to a USB Web-cam is the speed:
The Camera module from LI is directly connected to the Camera Image Signal Processing (ISP) interface on DM3730 (Beagle Board CPU) and thus, data from camera module can be processed much faster than an USB camera.
The other good news is that this camera is supported in the Angstrom Linux Kernel, however only in the 2.6.32 version. The camera patches can be found here.
To enable the camera support you need an U-Boot that contains I2C lines initialisation pull-ups (I’m using u-boot version 2011.09-r4) and include the camera name in the U-Boot environment variables (uEnv.txt) :
camera=lbcm3m1
dvimode="hd720 omapfb.vram=0:8M,1:4M,2:4M"
vram=16M
console="ttyS2,115200n8"
For the kernel (omap-psp-2.6.32) make sure that the mt9t112 driver module is enabled :
Device Drivers ->
Mutimedia support ->
Video capture adapters ->
Encoders/decoders and other helper chips ->
<M> mt9t112 support
If everything went ok you should see something like that in your kernel traces (dmesg):
mt9t112 2-003c: mt9t111 chip ID 2680
and the /dev/video0 node should also be available.
To get some infos about the camera I’m using :
root@beagleboard:~# v4l2-ctl --all
Driver Info:
Driver name   : omap3
Card type     : omap3/mt9t112//
Bus info      :
Driver version: 0
Capabilities  : 0x04000001
Video Capture
Streaming
Format Video Capture:
Width/Height  : 640/480
Pixel Format  : 'YUYV'
Field         : None
Bytes per Line: 1280
Size Image    : 614400
Colorspace    : JPEG (JFIF/ITU601)
Crop Capability Video Capture:
Bounds      : Left 0, Top 0, Width 640, Height 480
Default     : Left 0, Top 0, Width 640, Height 480
Pixel Aspect: 1/1
Crop Capability Video Capture:
Bounds      : Left 0, Top 0, Width 640, Height 480
Default     : Left 0, Top 0, Width 640, Height 480
Pixel Aspect: 1/1
Crop: Left 0, Top 0, Width 640, Height 480
Video input : 0 (camera: ok)
Streaming Parameters Video Capture:
Capabilities     : timeperframe
Frames per second: 30.000 (30/1)
Read buffers     : 0
To take the first pictures, I used MPlayer:
mplayer -vf screenshot -fps 15 tv:// -tv  driver=v4l2:device=/dev/video0
(and press 'S' to take a snapshot)
To record a video using Mencoder:
mencoder tv:// -tv driver=v4l2:width=320:height=240:device=/dev/video0 -nosound  -ovc lavc -o video.avi
(and press 'CTRL-C'  to stop recording)
Posted in Uncategorized | 18 Comments »
The SURF N150 is an amazing ultra-compact Wi-Fi USB dongle from Belkin , its small design (one of the smallest available usb adapter) make it very interesting for an embedded use:
Here are some snapshots:
However it does not work out of the Box with Linux/BeagleBoard.
Here a small guide how I’ve got it working:
root@beagleboard:~# lsusb  | grep Belkin
Bus 001 Device 004: ID 050d:1102 Belkin Components
google it gave that it’s a Realtek based chipset and supported in Linux Kernel (I’m using a 3.0.7 Kernel) in the RTL8192CU driver.
I rebuild the kernel enabling the RTL8192 driver (via make menuconfig) and copied the Firmware required by the driver into /lib/firmware/rtlwifi (on the Beagleboard SD card filesystem):
root@beagleboard:~# ls /lib/firmware/rtlwifi/
rtl8192cfw.bin   rtl8192defw.bin  rtl8712u.bin
rtl8192cufw.bin  rtl8192sefw.bin
I installed wpa_supplicant via opkg and edited the config file to match my AP parameters (WPA2):
root@beagleboard:~# cat /etc/wpa_supplicant.conf
ctrl_interface=/var/run/wpa_supplicant
eapol_version=1
network={
        ssid="Access Point Name"
        scan_ssid=1
        proto=RSN
        pairwise=CCMP TKIP
        key_mgmt=WPA-PSK
        psk="password"
}
I also edited the network interfaces file (/etc/network/interfaces) to add:
auto wlan0
iface wlan0 inet dhcp
    wpa-conf /etc/wpa_supplicant.conf
    wpa-driver wext
loading now the built-in wi-fi driver gave me the following:
root@beagleboard:~# modprobe rtl8192cu
[ 3484.251617] rtl8192cu: MAC address: 94:44:52:ee:af:bb
[ 3484.257049] rtl8192cu: Board Type 0
[ 3484.302947] rtl8192cu: rx_max_size 15360, rx_urb_num 8, in_ep 1
[ 3484.344635] rtl8192cu: MAC auto ON okay!
[ 3484.364440] usbcore: registered new interface driver rtl8192cu
root@beagleboard:~# [ 3484.474151] rtl8192cu: Tx queue select: 0x05
[ 3484.489776] rtl8192c: Loading firmware file rtlwifi/rtl8192cufw.bin
[ 3485.130889] ADDRCONF(NETDEV_UP): wlan0: link is not ready
root@beagleboard:~# ifup wlan0
[ 3587.279724] rtl8192cu: MAC auto ON okay!
[ 3587.335906] rtl8192cu: Tx queue select: 0x05
[ 3587.349029] rtl8192c: Loading firmware file rtlwifi/rtl8192cufw.bin
[ 3588.184417] ADDRCONF(NETDEV_UP): wlan0: link is not ready
udhcpc (v1.13.2) started
Sending discover...
Sending discover...
Sending discover...
No lease, forking to background
The link association with the AP failed (it get associated once or two times), so I didn’t want to spend much time debugging this driver because it really sucks !
The other alternative was using the driver sources from Realtek website : RTL819xCU_USB_linux_v3.3.1_3083.zip
I unpacked the sources and changed the driver Makefile as follow to enable the cross-compilation for the beagleboard:
--- rtl8188C_8192C_8192D_usb_linux_v3.3.1_3083.20111213/Makefile    2011-12-13 15:44:37.000000000 +0100
+++ rtl8188C_8192C_8192D_usb_linux_v3.3.1_3083.20111213_/Makefile    2012-01-03 02:03:54.080247526 +0100
@@ -34,7 +34,8 @@
CONFIG_BT_COEXISTENCE                = n
CONFIG_RTL8192CU_REDEFINE_1X1 =n

-CONFIG_PLATFORM_I386_PC = y
+CONFIG_PLATFORM_I386_PC = n
+CONFIG_PLATFORM_ARM_BEAGLE = y
CONFIG_PLATFORM_TI_AM3517 = n
CONFIG_PLATFORM_ANDROID_X86 = n
CONFIG_PLATFORM_ARM_S3C2K4 = n
@@ -240,6 +241,14 @@
INSTALL_PREFIX :=
endif

+ifeq ($(CONFIG_PLATFORM_ARM_BEAGLE), y)
+EXTRA_CFLAGS += -DCONFIG_LITTLE_ENDIAN
+ARCH := arm
+CROSS_COMPILE := arm-angstrom-linux-gnueabi-
+KVER  := 3.0.7-r100c
+KSRC ?= /home/zak/Projects/angstrom/build/tmp-angstrom_2008_1/work/beagleboard-angstrom-linux-gnueabi/linux-3.0.7-r100c/git
+endif
+
ifeq ($(CONFIG_PLATFORM_TI_AM3517), y)
EXTRA_CFLAGS += -DCONFIG_LITTLE_ENDIAN -DCONFIG_PLATFORM_ANDROID -DCONFIG_PLATFORM_SHUTTLE
CROSS_COMPILE := arm-eabi-
Make sure that the kernel sources (KSRC) and cross-compiler (arm-angstrom-linux-gnueabi) paths are correctly set and issue a make to build the driver 8192cu.ko that should be copied to /lib/modules/3.0.7/kernel/drivers/net/wireless/rtlwifi/8192cu.ko on the Beagle SD card file system.
Now when I load the new driver it prints a lot of stuffs but it works perfect 🙂 :
root@beagleboard:~# modprobe 8192cu
[  224.467834]
[  224.467834] rtw driver version=v3.3.1_3083.20111213
[  224.474761] register rtw_netdev_ops to netdev_ops
[  224.479797] CHIP TYPE: RTL8188C_8192C
[  224.483703]
[  224.483703] usb_endpoint_descriptor(0):
[  224.489257] bLength=7
[  224.491638] bDescriptorType=5
[  224.494750] bEndpointAddress=81
[  224.498016] wMaxPacketSize=200
[  224.501220] bInterval=0
[  224.503784] RT_usb_endpoint_is_bulk_in = 1
[  224.508087]
[  224.508087] usb_endpoint_descriptor(1):
[  224.513641] bLength=7
[  224.516021] bDescriptorType=5
[  224.519134] bEndpointAddress=2
[  224.522338] wMaxPacketSize=200
[  224.525543] bInterval=0
[  224.528076] RT_usb_endpoint_is_bulk_out = 2
[  224.532684]
[  224.532684] usb_endpoint_descriptor(2):
[  224.538269] bLength=7
[  224.540649] bDescriptorType=5
[  224.543731] bEndpointAddress=3
[  224.546936] wMaxPacketSize=200
[  224.550140] bInterval=0
[  224.552673] RT_usb_endpoint_is_bulk_out = 3
[  224.557067]
[  224.557067] usb_endpoint_descriptor(3):
[  224.562652] bLength=7
[  224.565002] bDescriptorType=5
[  224.568084] bEndpointAddress=84
[  224.571411] wMaxPacketSize=40
[  224.574493] bInterval=1
[  224.577056] RT_usb_endpoint_is_int_in = 4, Interval = 1
[  224.582519] nr_endpoint=4, in_num=2, out_num=2
[  224.582519]
[  224.588714] USB_SPEED_HIGH
[  224.600616] Chip Version ID: VERSION_NORMAL_TSMC_CHIP_88C.
[  224.606353] RF_Type is 3!!
[  224.624511] EEPROM type is E-FUSE
[  224.627990] ====> ReadAdapterInfo8192C
[  224.639587] Boot from EFUSE, Autoload OK !
[  224.955017] EEPROMVID = 0x050d
[  224.958221] EEPROMPID = 0x1102
[  224.961486] EEPROMCustomerID : 0x00
[  224.965148] EEPROMSubCustomerID: 0x00
[  224.969055] RT_CustomerID: 0x00
[  224.972351] _ReadMACAddress MAC Address from EFUSE = 94:44:52:ee:af:bb
[  224.979217] EEPROMRegulatory = 0x0
[  224.982788] _ReadBoardType(0)
[  224.985900] BT Coexistance = disable
[  224.989624] RT_ChannelPlan: 0x02
[  224.993041] _ReadPSSetting...bHWPwrPindetect(0)-bHWPowerdown(0) ,bSupportRem)
[  225.001525] ### PS params=>  power_mgnt(0),usbss_enable(0) ###
[  225.007629] ### AntDivCfg(0)
[  225.010650] readAdapterInfo_8192CU(): REPLACEMENT = 1
[  225.015960] <==== ReadAdapterInfo8192C in 390 ms
[  225.022216] rtw_macaddr_cfg MAC Address  = 94:44:52:ee:af:bb
[  225.028228] MAC Address from pnetdev->dev_addr= 94:44:52:ee:af:bb
[  225.054199] bDriverStopped:1, bSurpriseRemoved:0, bup:0, hw_init_completed:0
[  225.084991] usbcore: registered new interface driver rtl8192cu
root@beagleboard:~# ifup wlan0
[  233.954589] +871x_drv - drv_open, bup=0
[  233.967285]  ===> FirmwareDownload91C() fw:Rtl819XFwImageArray_TSMC
[  233.973968] FirmwareDownload92C accquire FW from embedded image
[  233.980255] fw_ver=v79, fw_subver=0, sig=0x88c0
[  234.042755] fw download ok!
[  234.045806] Set RF Chip ID to RF_6052 and RF type to 1T1R.
[  234.488586] IQK:Start!!!
[  234.518737] Path A IQK Success!!
[  234.544219] Path A IQK Success!!
[  234.562591] IQK: final_candidate is 0
[  234.566436] IQK: RegE94=101 RegE9C=10 RegEA4=fd RegEAC=3fd RegEB4=0 RegEBC=00
[  234.566467]  Path A IQ Calibration Success !
[  234.724853] pdmpriv->TxPowerTrackControl = 1
[  234.742858] MAC Address from REG_MACID = 94:44:52:ee:af:bb
[  234.748596] rtl8192cu_hal_init in 789ms
[  234.752716] MAC Address = 94:44:52:ee:af:bb
[  234.781982] -871x_drv - drv_open, bup=1
[  234.786285] ADDRCONF(NETDEV_UP): wlan0: link is not ready
[  234.803649] [rtw_wx_set_pmkid] IW_PMKSA_FLUSH!
[  234.808349] set_mode = IW_MODE_INFRA
ioctl[SIOCSIWAP]: Operation not permitted
[  234.871551] [rtw_wx_set_pmkid] IW_PMKSA_FLUSH!
[  234.982727] IW_SCAN_THIS_ESSID, ssid=ALICE-WLAN14, len=12
[  235.006866] (2)871x_drv - drv_close, bup=1, hw_init_completed=1
[  235.039001] rtl8192c_set_FwJoinBssReport_cmd mstatus(0)
[  235.054473] -871x_drv - drv_close, bup=1
[  236.092437] +871x_drv - drv_open, bup=1
[  236.096618] -871x_drv - drv_open, bup=1
[  236.116333] ADDRCONF(NETDEV_UP): wlan0: link is not ready
[  236.275207] survey done event(5)
[  236.280944] wpa_set_auth_algs, AUTH_ALG_OPEN_SYSTEM
[  236.286071] set_mode = IW_MODE_INFRA
[  236.311553]
[  236.311584]  wpa_ie(length:22):
[  236.316406] 0x30 0x14 0x01 0x00 0x00 0x0f 0xac 0x04
[  236.321777] 0x01 0x00 0x00 0x0f 0xac 0x04 0x01 0x00
[  236.327026] 0x00 0x0f 0xac 0x02 0x00 0x00 0x08 0xc0
[  236.350769] =>rtw_wx_set_essid
[  236.354003] ssid=ALICE-WLAN14, len=12
[  236.357879] Set SSID under fw_state=0x00000008
[  236.362640] [by_bssid:0][assoc_ssid:ALICE-WLAN14][to_roaming:0] new candidat8
[  236.374053] rtw_select_and_join_from_scanned_queue: candidate: ALICE-WLAN14()
[  236.383178] rtw_restructure_ht_ie IEEE80211_HT_CAP_MAX_AMSDU is set
[  236.389801] link to Ralink AP
[  236.392944] <=rtw_wx_set_essid, ret 0
[  236.405303] Set BSSID under fw_state=0x00000088
[  236.441955] set ch/bw before connected
[  236.689300] link to Ralink AP
[  236.703124] OnAuthClient
[  236.705841] network.SupportedRates[0]=82
[  236.710052] network.SupportedRates[1]=84
[  236.714141] network.SupportedRates[2]=8B
[  236.718261] network.SupportedRates[3]=96
[  236.722351] network.SupportedRates[4]=12
[  236.726470] network.SupportedRates[5]=24
[  236.730560] network.SupportedRates[6]=48
[  236.734680] network.SupportedRates[7]=6C
[  236.738769] network.SupportedRates[8]=0C
[  236.742889] network.SupportedRates[9]=18
[  236.746978] network.SupportedRates[10]=30
[  236.751190] network.SupportedRates[11]=60
[  236.755371] bssrate_len = 12
[  236.780883] OnAssocRsp
[  236.783477] report_join_res(5)
[  236.786682] rtw_joinbss_update_network
[  236.790649] +rtw_update_ht_cap()
[  236.794036] rtw_joinbss_update_stainfo
[  236.803894] ADDRCONF(NETDEV_CHANGE): wlan0: link becomes ready
[  236.810363] HW_VAR_BASIC_RATE: BrateCfg(0x15d)
[  236.820892] WMM(0): 0, a42b
[  236.827606] WMM(1): 0, a44f
[  236.835388] WMM(2): 0, 5e4322
[  236.838836] WMM(3): 0, 2f3222
[  236.850555] [HW_VAR_ACM_CTRL] Write 0x0
[  236.854919] HTOnAssocRsp
[  236.877685] update raid entry, mask=0xfffff, arg=0x80
[  236.892028] rtl8192c_set_FwJoinBssReport_cmd mstatus(1)
[  236.906677] SetFwRsvdPagePkt
[  236.909790] Set RSVD page location to Fw.
[  236.922790] =>mlmeext_joinbss_event_callback
[  237.047851] OnAction_back
[  237.050598] OnAction_back, action=0
[  237.054473] issue_action_BA, category=3, action=1, status=0
[  237.060394] OnAction_back
[  237.063262] OnAction_back, action=0
[  237.066925] issue_action_BA, category=3, action=1, status=0
[  237.102844]
[  237.102844]  ~~~~stastakey:unicastkey
[  237.124145]
[  237.124145]  ~~~~stastakey:groupkey
[  237.129364] ==> rtw_set_key algorithm(4),keyid(1),key_mask(2)
udhcpc (v1.13.2) started
Sending discover...
[  238.108398] rtl8192c_dm_RF_Saving(): RF_Normal
Sending select for 192.168.1.84...
Lease of 192.168.1.84 obtained, lease time 604800
adding dns 192.168.1.1
To automatically load the driver and configure the wlan0 interface when the board starts I created a simple script :
cat /etc/init.d/wlan8192cu
#!/bin/sh
echo -n "loading 8192cu module"
modprobe 8192cu
and start it before the networing script (S41networking) :
cd /etc/rcS.d/
ln -s ../init.d/wlan8192cu /etc/rcS.d/S40wlan8192cu
Posted in Uncategorized | 79 Comments »
In this post I’ll show you a Telehealth Medical Application running on the Beagle-Board.
The Operating System is Linux Angstrom and the GUI is based on QT/QML.
The User Interface includes:
Posted in Uncategorized | 3 Comments »
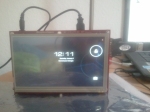
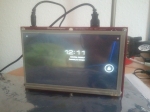
Recently I bought an ULCD7 Touchscreen for my BeagleBoard-xM, The ULCD7 is designed to provide a 800×480 7” landscape LCD panel with a resistive touch.
Following is a short list of the features of the ULCD7 :
Here are some pictures :
For the Software part, I’m using Angstrom Linux Distribution , I configured it to use the Linux-3.x Kernel which has patches to support the ULCD7.
The interaction with touchscreen in action:
Posted in Uncategorized | 2 Comments »
